Scenario 02 : Slicing a Workspace file with an associated Point Cloud
This scenario shows you how to slice a Workspace file using our API from start to finish, but this time, it will be about using our Cloud Point feature.
Step 0: Prepare files
To use the Point Cloud feature of our API, you're going to need to upload not just one file, but two. The two files are the Workspace file and the Shore Values (Point Cloud) file.
The Point Cloud file is a binary file containing a 3 dimensional array of doubles, each number representing the hardness at that specific point in the grid. A Point Cloud of 3x3x3voxels will have a voxel size of 1x1x1mm if the bounding box is defined by the points (0,0,0) and (3,3,3). If the same bounding box contained a 30x30x6 grid of voxels (arrayDimensions), then the voxel size would be 0.1x0.1x0.5mm.
You, as the user of the API need to specify the grid of voxels mentioned above. You do so in step2, by providing an array of 3 values in the property called arrayDimensions, if we continue on the example above, you would be providing the following values: arrayDimensions: [30, 30, 6].
( For more information about the Point Cloud format, check out the documentation: here )
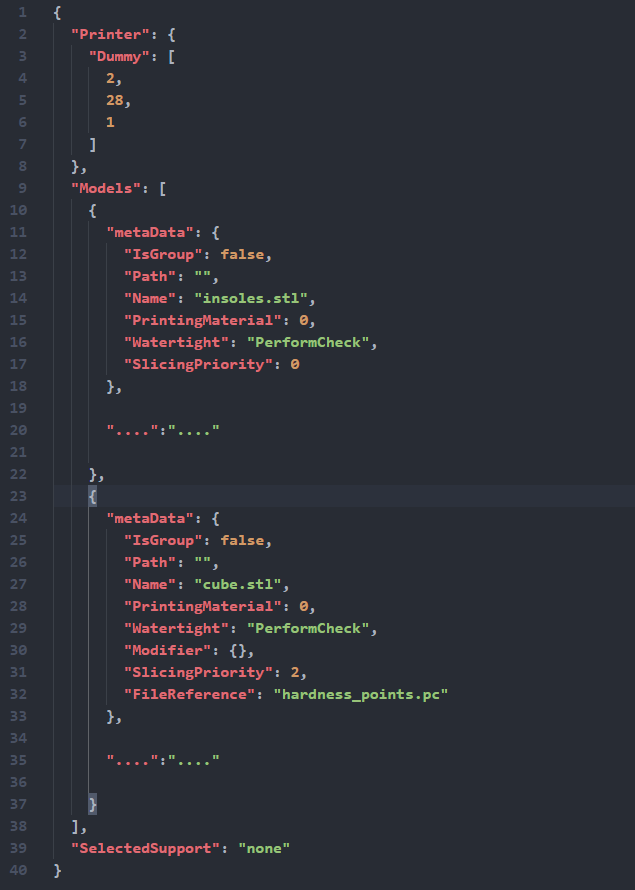
An important detail to consider here is the fact that, when you're creating the Workspace file, there will be two models included in it. It's written in JSON, and there is an important property called models, that property is an array containing the data about the models involved in the slicing process. In our case, it will include two models: the model we want to slice, and the modifier model. The modifier model is the model that's going to be used to apply the Point Cloud to the model we want to slice, specifying its location in the Workspace. ( For more information about modifiers, take a look at the Modifiers section in the documentation: http://docs.createitreal.com/v0.3/#main_workspace ).
When you upload both files, you upload them separately, however, you need to reference the Point Cloud file inside the Workspace file so that our slicer knows what file to use to on what model. To do that, you mention it in the Modifier Model properties. So, what you need to do specifically is:
Find the modifier model in the workspace file.
Find that model's
metaData->FileReferenceproperty.Give it the same name you gave the Point Cloud file when you upload it.
Now you should have both files needed:
The Workspace file
The Point Cloud file
The image to the side is an example Workspace file with two models, it shows the metaData of each model and the rest of data is left out for the sake of brevity.
For a full example Workspace file, click here.
Step 1: Upload the files
POST /upload/{filetype}/{filename}
In order to slice a file, first you need to upload it. This time, you'll need to upload both files mentioned in the previous step. Don't forget to mention the {filename} in the link. And definitely don't forget to mention the file type, at the moment we have the following types:
WS
PC_SV
PC_DE
XML
STL
EXTRA
Each type is used in a different situation, XML for an example is used when you want to use a custom configuration and not one of our recommended presets. In this particular situation, we're going to use two types:
WS : when you upload the Workspace file
PC_SV: when you upload the Shore Values (Point Cloud) file
EXTRA: which is an extra type for any extra files you want to upload and link to the slicing task even if it doesn't directly participate in the slicing task. An example is snapshot of the model being used for example. You can actually call it anything else other than "EXTRA".
The following is an example of uploading the Workspace file. Follow the same process when uploading the Shore Values file.
Again, don't forget to use the same filename when you upload the Shore Values file as the one you mentioned in metadaData -> FileReference inside the Workspace file.
HTTP Request
POST https://realvisiononline.azure-api.net/v1/upload/WS/insoles.json HTTP/1.1Content-Type: application/octet-streamCache-Control: no-cacheOcp-Apim-Subscription-Key: [YOUR_SUBSCRIPTION_KEY_HERE][ insoles.json ]
HTTP Response
HTTP/1.1 200 OKcontent-type: application/json; charset=utf-8date: Thu, 17 Dec 2020 10:52:18 GMTtransfer-encoding: chunkedvary: Origin{"fileId": "ca489322-8867-48aa-baaf-cbe72bcc0fbd","fileName": "insoles.json","type": "WS"}
Step 2: Start a slicing task
POST /ws/tasks/
Use both the fileId's you got back from the previous step for both files to start a slicing task. This request starts a slicing task and returns a taskIdwhich you will need later on.
HTTP Request
POST https://realvisiononline.azure-api.net/v1/ws/tasks HTTP/1.1Content-Type: application/jsonCache-Control: no-cacheOcp-Apim-Subscription-Key: [YOUR_SUBSCRIPTION_KEY_HERE]
{
"files":
[
{
"fileId": "ca489322-8867-48aa-baaf-cbe72bcc0fbd",
"fileName": "insoles.json",
"type": "WS"
},
{
"fileId": "ca489322-8867-48aa-traaf-cbe72bcc0fbnn",
"fileName": "hardness_points.pc",
"type": "PC_SV",
"arrayDimensions":[30, 30, 6],
"filamentName":"79 A_Covestro_TPU"
},
{
"fileId": "ca489322-8867-48aa-saaf-cbe72bcc0ddf",
"fileName": "snapshot.json",
"type": "EXTRA"
},
],
"settings":
{
"printerModel": "G2",
"supportType": "n",
"filamentPresetName": "79 A_Covestro_TPU"
}
}
HTTP Response
HTTP/1.1 200 OKcontent-type: application/json; charset=utf-8date: Thu,17Dec202010:54:21 GMTtransfer-encoding: chunkedvary: Origin{"taskId": "b596ac31-a782-4776-99cb-11aa2fc2134334e","queueDate": "2020-12-17T10:41:34.7919292Z",
"startDate": "2020-12-17T04:45:12.892Z",
"endDate": "2020-12-17T04:45:14.661Z","status": "queued",
"files":
[
{
"fileId": "ca489322-8867-48aa-baaf-cbe72bcc0fbd",
"fileName": "insoles.json",
"type": "WS"
},
{
"fileId": "ca489322-8867-48aa-traaf-cbe72bcc0fbnn",
"fileName": "hardness_points.pc",
"type": "PC_SV",
"arrayDimensions":[30, 30, 6],
"filamentName": "TPU_89A"
},
{
"fileId": "ca489322-8867-48aa-saaf-cbe72bcc0ddf",
"fileName": "snapshot.json",
"type": "EXTRA"
},
],
"settings":
{
"printerModel": "G2",
"supportType": "n",
"filamentPresetName": "79 A_Covestro_TPU"
}}
Step 3: Check the status of the slicing task
POST /ws/tasks/{taskId}
Use the taskId you got back from the previous request to check the status of the slicing task you started. The response will contain a status property which has four possible values:
queued: means that the slicing task has been added to a wait queue. You'll be able to see a
queueDatefor when it has been queued.
started: means that the slicing task has been picked up by one of our slicing servers and is being processed. The response will have a
startDateproperty for when the slicing actually started.running: It means that the slicing task processing is done and slicing is running. In this case, the response will have a
progressproperty that will tell you how far along is the slicing task is.finished: means the slicing task is finished and you're free to download the output file which will be either a GCode or an FCode file. When the status is finished, the response will also have two additional properties. So, it will have the
outputandinfoproperties. Theoutputhas information about the output file, and theinfoproperty has information about the print (estimated filament length, weight and time).failed: means the slicing task failed for some reason. In this case, the response will have an
errorproperty which will contain details about the error that happened.cancelled: means you cancelled the slicing task.
For now, we're going to assume the slicing task is finished at the time of the request. You'll notice in the samples below that the response has two additional properties: infoand output. Save theoutput -> outputId because we will be using in the next request.
HTTP Request
GET https://realvisiononline.azure-api.net/v1/ws/tasks/b596ac31-a782-4776-99cb-11aa2fc2134334e HTTP/1.1Cache-Control: no-cacheOcp-Apim-Subscription-Key: [YOUR_SUBSCRIPTION_KEY_HERE]
HTTP Response
HTTP/1.1 200 OKcontent-type: application/json; charset=utf-8date: Thu,17Dec202010:54:21 GMTtransfer-encoding: chunkedvary: Origin{"taskId": "b596ac31-a782-4776-99cb-11aa2fc2134334e","queueDate": "2020-12-17T10:41:34.7919292Z","startDate": "2020-12-17T04:45:12.892Z","endDate": "2020-12-17T04:45:14.661Z","status": "finished","files":[{"fileId": "ca489322-8867-48aa-baaf-cbe72bcc0fbd","fileName": "insoles.json","type": "WS"},{"fileId": "ca489322-8867-48aa-traaf-cbe72bcc0fbnn","fileName": "hardness_points.pc","type": "PC_SV","arrayDimensions":[30, 30, 6],"filamentName": "TPU_89A"},{"fileId": "ca489322-8867-48aa-saaf-cbe72bcc0ddf","fileName": "snapshot.json","type": "EXTRA"},],"settings":{"printerModel": "G2","supportType": "n","filamentPresetName": "79 A_Covestro_TPU"}"progress": 1,"info": {"time": "0:19:40","length": "1.69meter(s)","weight": "5gram(s)"},"output": {"outputName": "insoles.gcode","outputId":"cd5b659e-3ff3-4fb4-92a2-46136072ad1a","taskId":"b596ac31-a782-4776-99cb-11aa2fcb534e","fileId":"cd5b659e-3ff3-4fb4-92a2-46136072ad1a","format":"GCODE"}}
Step 4: Download output file (FCode/GCode)
GET /output/{outputId}/output
Use the outputId you got back from the previous request to download the final file.
HTTP Request
GET https://realvisiononline.azure-api.net/v1/output/cd5b659e-3ff3-4fb4-92a2-46136072ad1a/download HTTP/1.1Cache-Control: no-cacheOcp-Apim-Subscription-Key: [YOUR_SUBSCRIPTION_KEY_HERE]
HTTP Response
HTTP/1.1 200 OKcontent-disposition: attachment; filename=insoles.gcode; filename*=UTF-8''insoles.gcodecontent-type: application/octet-stream date: Thu, 17 Dec 2020 11:04:48 GMTvary: Origin; Header length: 221166; G-Code flavour: Create it REAL; Print time: 1:36:14; Filament used: 31.61 meter(s); Estimated weight: 95 gram(s); Print bounds location: (30,827, 23,246, 0); Print bounds size: (350, 112,802, 30)...